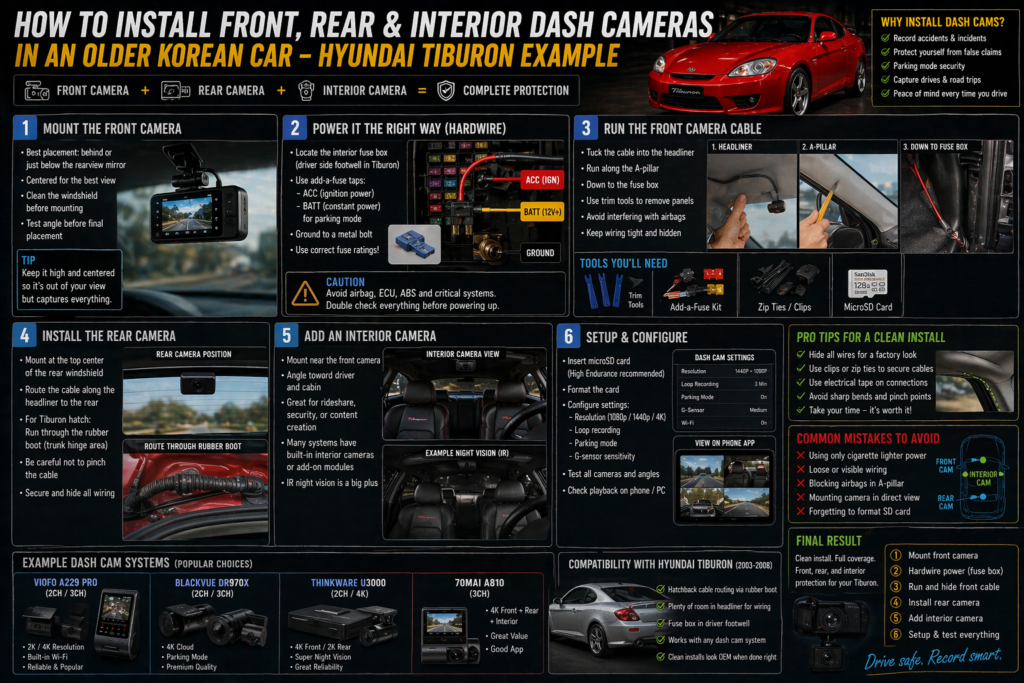
Adding dash cameras to an older car like the Hyundai Tiburon is one of the smartest upgrades you can make. It adds security, captures incidents, and even documents your drives or builds.
The good news?
👉 You don’t need a modern car to have a fully integrated multi-camera setup.
With the right approach, you can install:
- Front dash cam
- Rear camera
- Interior (cabin) camera
…cleanly and professionally—even in an older platform.
🎥 What You’ll Need


Core Equipment:
- Dual-channel or triple-channel dash cam system
- Hardwire kit (recommended over cigarette lighter)
- Fuse tap (“add-a-fuse”)
- Trim removal tools
- Zip ties or cable clips
Optional:
- MicroSD card (high endurance)
- Interior camera module (for cabin recording)
📍 Step 1: Mounting the Front Camera


Best Placement:
- Behind or just below the rearview mirror
- Centered on the windshield
- Out of your direct line of sight
Tips:
- Clean the glass before mounting
- Test angle before final stick
- Avoid placing too low (blocked view)
👉 Goal: Invisible from driver seat, clear road view
🔌 Step 2: Powering the Camera (Hardwire Method)


Skip the cigarette lighter—go hardwired.
Why Hardwire?
- Cleaner install (no hanging wires)
- Enables parking mode recording
- Always-on functionality (if configured)
Steps:
- Locate fuse box (driver side footwell in Tiburon)
- Use fuse tap:
- One for ACC (ignition)
- One for constant power (optional for parking mode)
- Ground the wire to a metal bolt
⚠️ Important:
- Use correct fuse ratings
- Avoid critical systems (airbags, ECU)
🧵 Step 3: Running the Front Camera Cable


Route:
- Tuck cable into headliner
- Run along A-pillar
- Down to fuse box
Tips:
- Use trim tools (don’t force panels)
- Avoid interfering with airbags in A-pillar
- Keep wiring tight and hidden
👉 Clean routing = factory look
🎥 Step 4: Installing the Rear Camera


Placement:
- Top center of rear windshield
Cable Routing:
- Along headliner → rear of car
- For Tiburon hatch:
- Route through rubber boot (trunk hinge area)
Challenges:
- Tight spaces in hatch wiring
- Avoid pinching cable
👉 Take your time here—this is the trickiest part
👁️ Step 5: Adding an Interior Camera


Interior cameras are optional but useful.
Good For:
- Ride-sharing
- Security
- Content creation
Placement:
- Near front camera
- Slight angle toward driver + cabin
Notes:
- Some units have built-in interior cams
- Infrared helps with night recording
⚙️ Step 6: Setup and Configuration


Once installed:
Configure:
- Resolution (1080p / 4K depending on unit)
- Loop recording
- Parking mode sensitivity
- G-sensor settings
Test:
- All cameras recording
- Proper angles
- No loose wiring
🔥 Pro Tips for a Clean Install
- Hide all wiring (no visible cables)
- Use electrical tape for a factory look
- Secure cables with clips or zip ties
- Avoid sharp bends or pinch points
- Double-check fuse connections
👉 A clean install feels OEM—not aftermarket
⚠️ Common Mistakes to Avoid
- Using only cigarette lighter power
- Running cables loosely (rattling later)
- Blocking airbags in A-pillar
- Mounting camera in driver’s view
- Forgetting to format SD card
🏁 Final Result
When done right, your Hyundai Tiburon will have:
- Modern multi-camera coverage
- Clean, hidden wiring
- Parking protection
- A tech upgrade that rivals newer cars
Conclusion
Installing a dash cam system in an older Korean car is one of the highest-value upgrades you can do.
It’s:
- Practical
- Affordable
- Future-proof
And best of all—it bridges the gap between old-school driving and modern tech.
👉 Because sometimes the best upgrades…
…aren’t about speed.
They’re about awareness and protection.