Spray painting your car sounds simple—grab some cans and go, right?
That’s exactly how people end up with:
- Uneven finish
- Paint drips
- “Matte… but not on purpose”
If you want your car to actually look clean, intentional, and KDM-worthy, the truth is:
👉 90% of a good paint job is prep—not spraying.
Let’s break it down the right way.
🎯 First: Set Real Expectations
Before you start:
- Spray paint (rattle can) ≠ professional paint booth
- But it can look very good if done right
- Ideal for:
- Project cars
- Track builds
- Budget aesthetic refresh
👉 If you’re expecting showroom gloss—you’ll need pro equipment.
If you want clean, aggressive, DIY style—this guide will get you there.
🧰 What You’ll Need


Essentials:
- Sandpaper (400, 800, 1500+ grit)
- Primer (automotive)
- Color paint (quality matters—don’t cheap out)
- Clear coat
- Masking tape + plastic sheets
- Degreaser or isopropyl alcohol
👉 Optional but huge upgrade:
- Spray gun + compressor (if you want next-level finish)
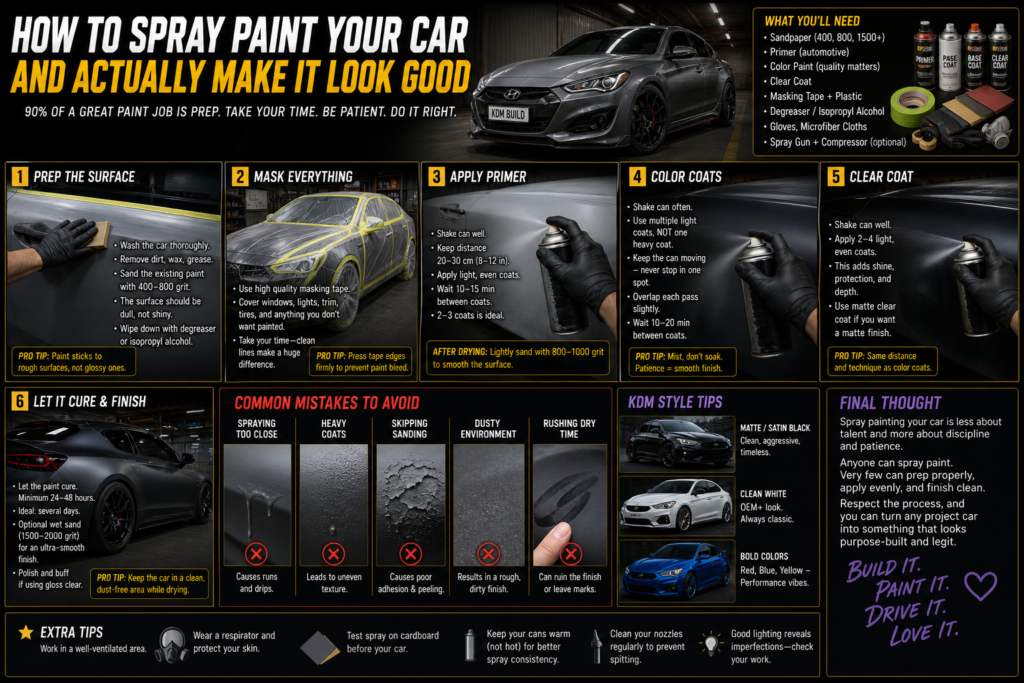
🧼 Step 1: Prep the Surface (Most Important Step)


If you skip this, don’t bother painting.
Do this properly:
- Wash the car thoroughly
- Degrease the surface
- Sand down the existing paint (dull, not shiny)
👉 Paint sticks to rough surfaces, not glossy ones.
Pro tip:
- You don’t need to remove all paint
- Just remove shine and imperfections
🛡️ Step 2: Mask Everything You Don’t Want Painted


Take your time here.
Mask:
- Windows
- Lights
- Trim
- Tires
👉 Bad masking = amateur look instantly.
⚪ Step 3: Apply Primer (Foundation Layer)


Primer makes or breaks your final look.
How to do it:
- Light, even coats
- Keep distance ~20–30 cm
- Let each coat dry before next
👉 Don’t rush. Thick coats = drips.
After drying:
- Lightly sand with fine grit (800–1000)
🎨 Step 4: Color Coats (Where Most People Mess Up)


This is where patience wins.
Key rules:
- Multiple light coats (not one heavy coat)
- Keep can moving—never stop in one spot
- Overlap each pass slightly
👉 Think: mist, not soak
Timing:
- Wait 10–20 minutes between coats
💎 Step 5: Clear Coat (This Is the Finish)


Clear coat is what gives:
- Shine
- Protection
- Depth
Apply same way:
- Light, even layers
- 2–4 coats
👉 Want matte look?
- Use matte clear coat instead
🔥 Step 6: Cure and Finish


Let the paint cure:
- Minimum: 24–48 hours
- Ideal: several days
After curing:
- Optional wet sand (1500–2000 grit)
- Polish for smoother finish
👉 This step separates “DIY” from “damn, that looks good.”
⚠️ Common Mistakes to Avoid
- ❌ Spraying too close → drips
- ❌ Heavy coats → uneven texture
- ❌ Skipping sanding → peeling paint
- ❌ Dusty environment → rough finish
- ❌ Rushing drying time
🔧 KDM-Specific Style Tips
If you’re building for that Korean car aesthetic:
- Matte black / satin grey → aggressive look
- Clean white → OEM+ style (popular on Hyundai builds)
- Bright colors (red, blue) → performance vibe
👉 KDM style isn’t about wild—it’s about clean and intentional.
🔥 Final Thought
Spray painting your car is less about talent and more about discipline and patience.
Anyone can spray paint.
Very few can:
- Prep properly
- Apply evenly
- Finish clean
If you respect the process, you can turn even a rough project car into something that looks purpose-built and legit.